
I lost one of my small circle of friends yesterday, Aug. 25. In spite of radiation treatment and chemotherapy, Nick was gone from a fast moving cancer in about a month after diagnosis. He was 56.
Nick was not a model railroader. Other than that, we shared several interests and our outlook on life was almost identical. We both would defer gratification. We both were pack rat collectors. And we both had more projects contemplated than could be accomplished in several lifetimes. On the latter two points, Nick was much worse than I.
I believe that nothing in the Lord's plan is for naught; even a tragedy like this death. Nick's death has reinforced a couple of things pertinent to model railroading: don't put it off and resize your expectations. Starting my first large model railroad at age 55, I had already lamented the first lesson. I got so much enjoyment, such a sense of accomplishment out of building my model railroad that I already regretted not having started sooner. But during all of the previous years, delaying the gratification of building a model railroad seemed like the logical thing to do at the time. In some cases I had "direct encouragement" ("Why don't you put that off until after retirement?"). Death, as in my friend's case, does not always respect your plans. My advice to all who are still in the armchair is don't wait, you'll be a whole lot happier.
The other lesson, one that I had just embarked on a few weeks previous, is to downsize your life to meet reasonable expectations. In this vein, I had begun to sell off equipment that I was not likely to use on this railroad because, although I would like to think that a bigger model railroad was just over the horizion, the reality is that I will be lucky to finish the one that is currently under construction. Being so close to another's untimely death has reinforced that reality.
So I am going to downsize my model railroad collection as well as equipment for another hobby that I pursue where I also have way too much stuff. I will use this opportunity to upgrade my roster while I thin the herd. By the same token, projects that have no reasonable completion date will be abandoned.
I will be stepping up my production of articles for model railroad publications. I have two already accepted and potentially two more. I will continue to write articles, possibly a book, and for this blog as well. A good idea is no good if it's in my head and never gets out.
Finally, I had been dipping my toe into some small scale model railroad manufacturing; now I'm going to put the whole foot in. I'm moving ahead on several small projects that will be offered for sale, initially in the O Scale community, but potentially in other scales. More on that in a subsequent post.
Rest in peace, Nick. I will miss you more than I can say. Even in death, you are a good friend.
Sunday, August 26, 2012
Monday, August 13, 2012
Molds and Moldmaking 2
This is a continuation of Molds and Moldmaking 1. I didn't know that Blogger had a page limit - apparently it does.
I was surprised and pleased with the mold made by this method. There was some latex 'flash' that had to be removed where latex rubber flowed under the master. This was accomplished with a X-acto knife.
All was not perfect, however. The mold came out curved as can be seen in the next picture. It could be the way I removed the mold from the master and the mold box; after cutting around the edges as one would for a cake, I lifted one end and 'peeled' it back. That could have put the curve into the mold. More likely I had too little silicone over the top of the master. Many of the pourable silicones advise to have 1/2" on all sides of the master. This mold only had 1/4" over the top of the master.

What to do to make the castings? I tried to stick the mold down with double stick tape but, not surprisingly, the tape would not stick to the silicone - not much does. I finally hit on using the non-stick surface of the tile to push down on the filled mold and hold it flat while the plaster dries. The next photo shows the tile work surface inverted over the filled mold. During drying I had additional weight on top of this to hold the mold flat.

Here's the tile lifted from the cured casting still in the mold:

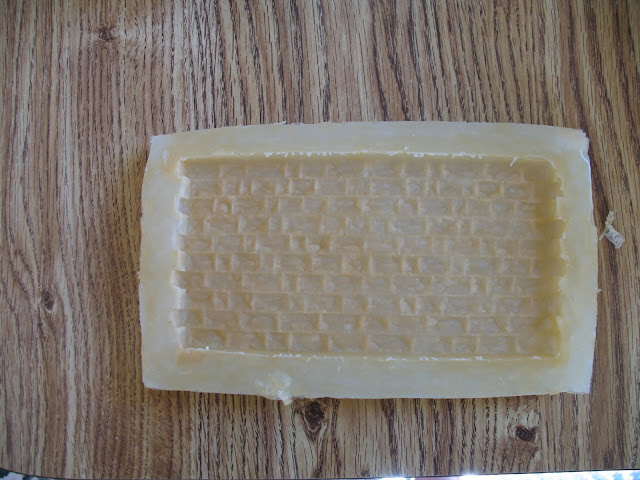
This is the de-molded casting:

The casting is fully-filled and sharp with only a couple of small air bubbles that can be seen in this close-up:

How did I fill the mold and with what?
You'll notice that the casting is a light gray color - that's the way it came from the mold. The material is Merlin's Magic (MM) a dental stone developed for the Fantasy/Wargamer and D&D market. The spec sheet on MM indicates that it is harder and stronger than hydrocal. It comes in white, tan, gray and dark gray. I used the gray. This worked out well, it looks like only a black ink wash will be needed to match the real stone.
Since this is dental stone, it behaves a little differently than plaster. A tutorial on using MM can be found here:
http://www.hirstarts.com/casting/dental.html
I like this stuff. I used a slightly different mixing technique that seems to work with my 'squish' technique for holding the mold flat.
First the mold was sprayed with a soapy water mixture to act as mold release and to help prevent formation of air bubbles against the mold surface. I mixed a batch of MM about the consistency of thin pancake batter. I filled the mold about 80% with this mixture by slowly pouring a small stream into the mold to minimize bubbles. This thin mixture will settle into the mold details easily.
I pounded the table with my fist to release any air bubbles sticking to the detail parts of the mold. Next, I used a small object about the size of a toothpick inserted into the wet plaster and run along the face of the mold to release any air bubbles and several large ones came to the surface.
I mixed a stiffer batch of the MM, just to the point where it would pour readily with a little coaxing from the spoon and poured that slowly into the mold and let it self level. This stiffer mixture adds body to the mix without having to settle into the mold detail. I had to mix two stiff batches to fill the mold to slightly over the top.
Finally I inverted the tile over the mold and added weight in the form of several phone books (the phone books are small where I live). Some of the mixture oozed out between the mold and the tile, that's OK, it indicates that the mold is essentially full. I then resisted the temptation to look at the mold for about an hour or more.

The results you can see above. The casting had only a small void in the back. The casting is otherwise full and dense.
I was surprised and pleased with the mold made by this method. There was some latex 'flash' that had to be removed where latex rubber flowed under the master. This was accomplished with a X-acto knife.

All was not perfect, however. The mold came out curved as can be seen in the next picture. It could be the way I removed the mold from the master and the mold box; after cutting around the edges as one would for a cake, I lifted one end and 'peeled' it back. That could have put the curve into the mold. More likely I had too little silicone over the top of the master. Many of the pourable silicones advise to have 1/2" on all sides of the master. This mold only had 1/4" over the top of the master.

What to do to make the castings? I tried to stick the mold down with double stick tape but, not surprisingly, the tape would not stick to the silicone - not much does. I finally hit on using the non-stick surface of the tile to push down on the filled mold and hold it flat while the plaster dries. The next photo shows the tile work surface inverted over the filled mold. During drying I had additional weight on top of this to hold the mold flat.

Here's the tile lifted from the cured casting still in the mold:

This is the de-molded casting:

The casting is fully-filled and sharp with only a couple of small air bubbles that can be seen in this close-up:

How did I fill the mold and with what?
You'll notice that the casting is a light gray color - that's the way it came from the mold. The material is Merlin's Magic (MM) a dental stone developed for the Fantasy/Wargamer and D&D market. The spec sheet on MM indicates that it is harder and stronger than hydrocal. It comes in white, tan, gray and dark gray. I used the gray. This worked out well, it looks like only a black ink wash will be needed to match the real stone.
Since this is dental stone, it behaves a little differently than plaster. A tutorial on using MM can be found here:
http://www.hirstarts.com/casting/dental.html
I like this stuff. I used a slightly different mixing technique that seems to work with my 'squish' technique for holding the mold flat.
First the mold was sprayed with a soapy water mixture to act as mold release and to help prevent formation of air bubbles against the mold surface. I mixed a batch of MM about the consistency of thin pancake batter. I filled the mold about 80% with this mixture by slowly pouring a small stream into the mold to minimize bubbles. This thin mixture will settle into the mold details easily.
I pounded the table with my fist to release any air bubbles sticking to the detail parts of the mold. Next, I used a small object about the size of a toothpick inserted into the wet plaster and run along the face of the mold to release any air bubbles and several large ones came to the surface.
I mixed a stiffer batch of the MM, just to the point where it would pour readily with a little coaxing from the spoon and poured that slowly into the mold and let it self level. This stiffer mixture adds body to the mix without having to settle into the mold detail. I had to mix two stiff batches to fill the mold to slightly over the top.
Finally I inverted the tile over the mold and added weight in the form of several phone books (the phone books are small where I live). Some of the mixture oozed out between the mold and the tile, that's OK, it indicates that the mold is essentially full. I then resisted the temptation to look at the mold for about an hour or more.

The results you can see above. The casting had only a small void in the back. The casting is otherwise full and dense.
Molds and Moldmaking 1
This post to my blog has a checkered history. I initially did this project in the spring of 2010. I wrote this up as two posts to the blog. Then I had the idea that this might be a good candidate for an article, even though the subject matter had been covered before. The article was submitted to "O Scale Trains" magazine, it was accepted and published in the March/April 2011 issue.
O Scale Trains' terms allow the original authors to re-post or republish articles after certain conditions are met and a certain time has past. I can now present this material on my blog. Here, in two parts, is a somewhat expanded version of the O Scale Trains article. Thanks to O Scale Trains for the opportunity to republish.
The B&O Tray Run Viaduct and the smaller Amblersburg Viaduct will be scenic features on my layout. Both of these are massive cut-stone structures that, even after selective compression, reproducing them will require scores of stone wall castings.
I had a cut stone wall casting which fit the bill for size and "look" and I decided to reproduce this one in the quantities required by making a mold of it and casting plaster replicas.
The usual procedure for making a mold involves a two-part, pourable silicone or urethane mold rubber to produce the mold. A starter mold making kit costs between $40 and $60. Latex mold making materials are available at considerably less cost, but the molds that they produce are more flexible and may not produce castings that will interlock without gaps. In addition, latex molds are not as durable as silicone or urethane.
The cost of the mold making materials was steep, but do-able. However the unused silicone material has only a 6 month shelf life after opening and I did not want to have to throw away most of the cost of the unused materials should I not be able to use them in time.
Therefore, I wanted a method with less waste that was, hopefully, cheaper. An article "Cast Your Own Urban Structures" by Dick Scott appeared in the July 2001 Model Railroader. In his article Mr. Scott described a method for making molds using latex mold making rubber and silicone caulk from a tube. Long story short, you use several coats of the latex to coat the master and reproduce the details and use the silicone caulk to back-up and reinforce the latex and fill out the mold box. This method also results in a mold with a flat back (just like a poured silicone mold) that does not require extra support like straight latex molds do.
To begin I bought some "Mold Builder" latex mold making compound from Michael's; with a coupon it was about $9 and can make many, many molds (it also has no expiration date!).

I also built a work surface to make the molds on. It's a 8" x 10" glazed ceramic tile bought at Home Depot for less than $2 glued (Liquid Nails) to and backed by 1/2" plywood. Why tile? Because the latex or other mold making compound can be scrapped from it without damaging the surface.

Here is the master being covered in latex mold compound. The light tan on the left is the previous layer fully dried. On the right, new latex is being applied, it is a whiteish compound. Follow the instructions on the jar of latex.

Here the next layer of latex is fully applied.

The mold box is built around the latex-covered master. The mold box and any of the tile surface that it encloses must be covered with a few coats of latex too or the silicone will stick to it and be hard or impossible to remove. About six coats of latex were applied before filling the mold box with silicone.

Here's the mold partially filled with silicone. I built up the layers in 1/8" thicknesses, per Scott's article. The silicone that I used was 'Mainstays' - Wal-Mart's brand which cost $2.76 a tube (caulking gun size) [note: mainstays is no longer available at Wal-Mart; GE silicone will work but is more expensive]. This mold used about a tube and a half. After the last coat, the back of the mold was struck off flush by using a taping knife (4" putty knife)

O Scale Trains' terms allow the original authors to re-post or republish articles after certain conditions are met and a certain time has past. I can now present this material on my blog. Here, in two parts, is a somewhat expanded version of the O Scale Trains article. Thanks to O Scale Trains for the opportunity to republish.
Begin Original Posting:
The B&O Tray Run Viaduct and the smaller Amblersburg Viaduct will be scenic features on my layout. Both of these are massive cut-stone structures that, even after selective compression, reproducing them will require scores of stone wall castings.
I had a cut stone wall casting which fit the bill for size and "look" and I decided to reproduce this one in the quantities required by making a mold of it and casting plaster replicas.
The usual procedure for making a mold involves a two-part, pourable silicone or urethane mold rubber to produce the mold. A starter mold making kit costs between $40 and $60. Latex mold making materials are available at considerably less cost, but the molds that they produce are more flexible and may not produce castings that will interlock without gaps. In addition, latex molds are not as durable as silicone or urethane.
The cost of the mold making materials was steep, but do-able. However the unused silicone material has only a 6 month shelf life after opening and I did not want to have to throw away most of the cost of the unused materials should I not be able to use them in time.
Therefore, I wanted a method with less waste that was, hopefully, cheaper. An article "Cast Your Own Urban Structures" by Dick Scott appeared in the July 2001 Model Railroader. In his article Mr. Scott described a method for making molds using latex mold making rubber and silicone caulk from a tube. Long story short, you use several coats of the latex to coat the master and reproduce the details and use the silicone caulk to back-up and reinforce the latex and fill out the mold box. This method also results in a mold with a flat back (just like a poured silicone mold) that does not require extra support like straight latex molds do.
To begin I bought some "Mold Builder" latex mold making compound from Michael's; with a coupon it was about $9 and can make many, many molds (it also has no expiration date!).

I also built a work surface to make the molds on. It's a 8" x 10" glazed ceramic tile bought at Home Depot for less than $2 glued (Liquid Nails) to and backed by 1/2" plywood. Why tile? Because the latex or other mold making compound can be scrapped from it without damaging the surface.


Here is the master being covered in latex mold compound. The light tan on the left is the previous layer fully dried. On the right, new latex is being applied, it is a whiteish compound. Follow the instructions on the jar of latex.

Here the next layer of latex is fully applied.

The mold box is built around the latex-covered master. The mold box and any of the tile surface that it encloses must be covered with a few coats of latex too or the silicone will stick to it and be hard or impossible to remove. About six coats of latex were applied before filling the mold box with silicone.

Here's the mold partially filled with silicone. I built up the layers in 1/8" thicknesses, per Scott's article. The silicone that I used was 'Mainstays' - Wal-Mart's brand which cost $2.76 a tube (caulking gun size) [note: mainstays is no longer available at Wal-Mart; GE silicone will work but is more expensive]. This mold used about a tube and a half. After the last coat, the back of the mold was struck off flush by using a taping knife (4" putty knife)

Thursday, August 9, 2012
Model Rail Radio O Scale National Show
While attending the O Scale National Convention, I recorded several interviews for Model Rail Radio. Those interviews have been collected into a special show. This show is not yet available from the Model Rail Radio home page, but it is available from iTunes (use your iTunes application on your computer/phone/pad to search for Model Rail Radio). It's also available from the Internet Archive by following this link:
http://www.archive.org/download/ModelRailRadio/mrr_072112.mp3
When you click on this link, the Internet Archive player will launch and begin playing the episode.
My purpose in recording this show (and I believe that the episode demonstrates) is that 2-Rail O Scale is a vibrant community with thoughtful, intelligent and skilled modelers, historians and artisans. Topics in the show include 19th Century modelling, layout design, preserving historic layouts and an interview with Tony Koester who admits that even he began model railroading with a Lionel O-27 layout (Hmm...this is the second time that I have run onto Tony at an O Scale event, could he be a closet O-Scaler? :-) )
It is my contention that few people start the hobby in 2-rail O Scale, but I believe that it is where increasing numbers of people will end up. With the current state of the art in HO, factory produced locomotives and rolling stock meet or beat what the best modeler can do. As Clark Kooning (Master Model Railroader and former director of the NMRA) admitted in response to my question on one episode of MRR, he not upgrading his Blackstone HOn3 locos on his current layout under construction because "they have everything".
As factory HO models begin to routinely exceed the skills of a Master Model Railroader to improve upon them, what's a modeler to do? Come to O Scale. We have great kits and factory rolling stock that can be improved upon; not because the factory product is crude, but because so much more can be done in O Scale. Things like working brakes, coupling air hoses, operating steam reverse gear, highly detailed track work and, most importantly, it's all large enough to see with aging eyes.
O Scale need not be expensive as the gap between HO and O is narrowing quickly (e.g. an HO car is $30-40 even $50 and an O Scale car from Atlas is about $60). Plus you need less O Scale to fill the available space.
I'll get off of my soapbox and let you listen to the episode and decide for yourself.
Subscribe to:
Posts (Atom)


